We’re getting close to the end. Today was pretty much our last class to cover new stuff before the exam. Wednesday will be a review and Thursday we write the exam.
Today’s class started with disaster relief with Mike Reynolds. The Earthship crew has gone all over the world where natural disasters have occurred and built structures to help the locals house themselves. Often these are in places where materials are difficult to get. They certainly aren’t building structures with a tonne of systems, because that is where a huge chunk of the cost is. Basic structures that catch water that can be used for a shower, which then feeds a grey water cell that filters the water which is then used to flush a toilet.
And when I say flush a toilet, it’s a bucket flush system. This is where you have a bucket beside your toilet that gets filled with water, because the toilet has no tank. In most places, the toilet tanks are difficult to come by, as well as all the parts break down and then they can’t get replacements. So they just flush the water that is in the toilet and then just pour the stuff in the bucket back into the toilet when they’re done. A bit more manual, but works none the less. In some places, this is a huge luxury.
Some of the places where they have built structures include:
- Bolivia
- Honduras
- Ogalala Sioux Reservation in South Dakota
- Belgium
- Mexico
- Japan
- Scotland
- Nicaragua
- Andaman Islands, south pacific
- Haiti
- Sierra Leone
- Malawi
- Easter Island
- Ushuaia, southern tip of Argentina
- Philippines
They don’t always build a simple home either. In Sierra Leone they built a school, based on a flower pattern. They built two of the rooms, and one of the toilet rooms and the locals built the rest of it. Pretty much everywhere they go to do this, many people come together and are very excited to be doing something to improve their lives. Sometimes they get a lot of resistance in more developed countries, but once they demonstrate what it is they are doing, most places have not only accepted Earthship technologies, but heartily embraced it.
After that class, we had Earthship Finishes with Phil. This is where we learned about all of the alternatives that can be used to finish ceilings, floors and walls in an Earthship. Some things work better than others. For example, you don’t want to put in a wood floor in an Earthship because it will block solar gain. You want solar gain to store the sun’s energy to keep you warm. If you put in a wood floor, you won’t get that and you’ll be cold.
We also talked about the price and labor effort of the finishes. Oh and environmental foot print of various materials. Things to keep in mind when thinking of what to finish your Earthship with.
We then had lunch and it was back to work at the main build site. First, we pounded rebar stakes through the Trex plate on top of the front face tire work to anchor it in place. Unfortunately, I didn’t take any pictures of that. Sorry.
However, after that we were working on pouring the footings inside the house. First we needed to reinforce the T joints of the rebar that goes in the footing. So we cut some rebar, bent them into L shapes and then tied them with wire to the joints. Here is a picture of the L shaped rebar before we tied it in place with the wire.

We didn’t put height stakes to hold the rebar up for these footings, so what we did is put a few shovel fulls of concrete into the trench and then pulled up the rebar to sit on top of the concrete so the rebar sits about 2 to 3 inches (5 to 7.5 cm) above the floor of the trench.

From there, you just shovel more concrete into the trench until you get it up to sub floor level. Here is a picture of that in progress.
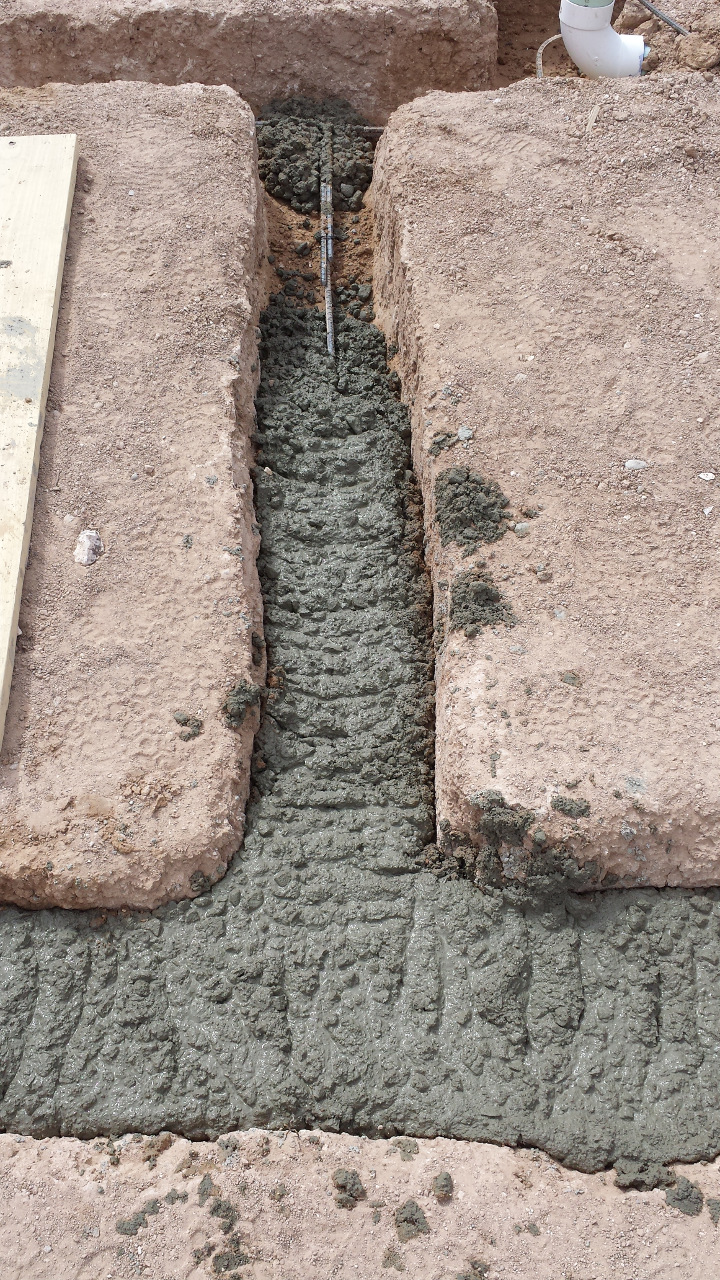
After you get all of the concrete into the trench, you level it off and then put anchor bolts into it so you can attach wall stuff to it.

Then you’re pretty much done. You just need to wait for it to set up. That takes about 12-24 hours here in the desert.

Some of you may have been wondering how you make a tire wall into something smooth looking. Well the first part of that is to pack out the spaces between the tires to bring it out to the edge of the tires. Usually this is done using an adobe type mud and some bottles or cans. Here is a picture of the first layer of pack out.

After this sets, there will be another layer of pack out, then you’ll start on some full rough coats, until you cover up all of the tires, then a few final coats. It’s many layers, but that’s kinda the idea. You want to build mass into your walls so they can store temperature.
